ECE5725 | May 21, 2021 A Project By Emily Wang(jw829) and Hyun Jong Lee(hl693)
Demonstration Video
Project Objective
The objective of the project was to create a gesture-controlled bluetooth speaker that responds to user inputs to control music playback on a bluetooth device. Supported playback commands include pausing and resuming of music, changing of volume, skipping forward a song, and returning to the previous song. The speaker uses an LED strip which outputs different patterns, colors and intensities of light to display the type of gesture that the speaker recognizes.
Introduction
Today, nearly everyone has bluetooth-enabled devices that carry their music wherever they go. While many people often bring a set of headphones to listen to their music, it’s always nice to share it with more people via a nice bluetooth speaker. For many college students, a portable, stylish bluetooth speaker is an essential item in the dorm.
Our project was to create a gesture-controlled bluetooth speaker using two Raspberry Pis, where users can use hand gestures to control music playback. Additionally, the speaker emits LED lighting that visually suggests to users the state of the speaker.
Design and Testing
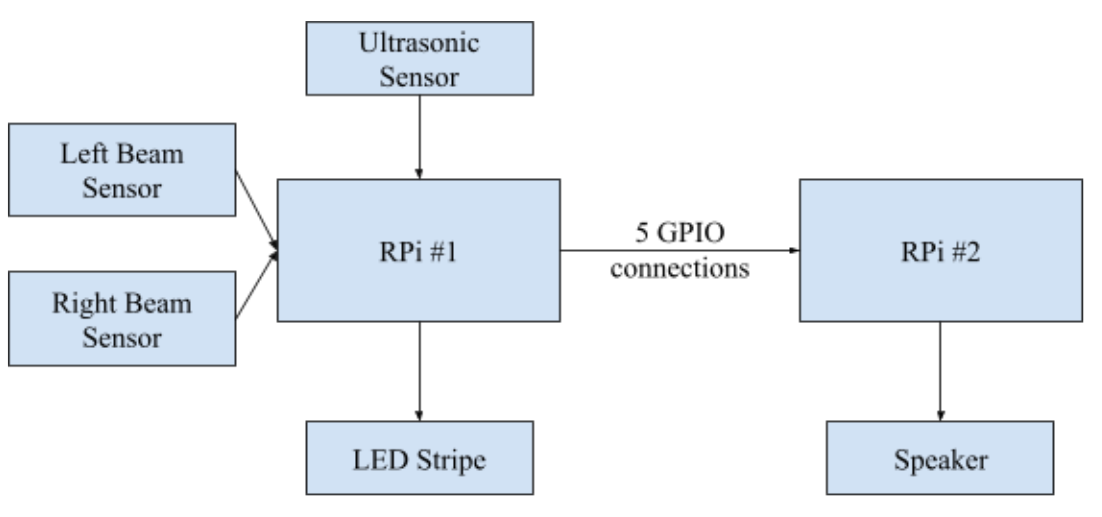
Figure 1. Overall electrical system
The speaker’s functionalities are controlled by two Raspberry Pis, as seen in Figure 1. One Raspberry Pi is responsible for gesture recognition as well as LED strip control (RPi #1), while another Raspberry Pi is responsible for receiving audio from bluetooth devices, as well as sending back commands to the device that matches the gesture detected by the first Pi. In this report, these two Pis will be referred to as RPi #1 and RPi #2.
RPi #1 connects to two sets of IR break-beam sensors to recognize the hand gestures. More specifically, each set consists of an IR emitter and an IR receiver. The receiver connects to RPi #1 via a GPIO pin, which reads a 1 when the beam is present and 0 when the beam breaks. The file RPi_1_integration.py (Code Appendix B) is the main driver for RPi #1, and is set to run on boot. The program serves three main purposes - gesture detection, LED control, and GPIO-message sending to RPi #2. In order to recognize the hand swiping from side to side, we have a function called swiped() in RPi_1_integration.py that detects consecutive beam breaks. For example, if the left beam breaks first and the right beam breaks within a given time range, the next song is played. If the right beam breaks first and the left beam breaks within a given range, the previous song is played.
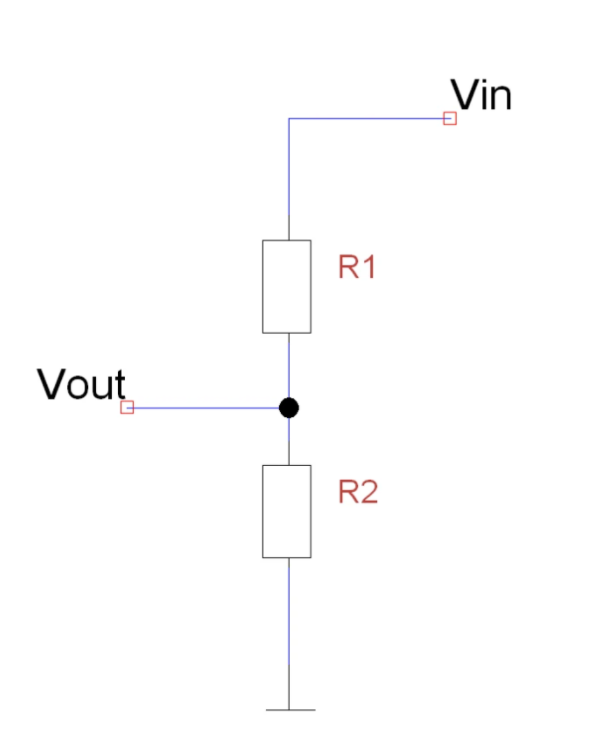
To detect the volume, we are using an ultrasonic sensor that detects the hand distance in centimeters. The HC-SR04 sensor has four pins: ground(GND), Echo Pulse Output(ECHO), Trigger Pulse Input(TRIG), and 5V Supply(Vcc). The GND and Vcc are both connected directly to the RPi#1. We use our RPi#1 to send an input signal to TRIG, which triggers the sensor to send an ultrasonic pulse. The pulse waves bounce off of hands and are reflected back to the sensor. The sensor then detects these returned waves and measures the time between the trigger and returned pulse, and then sends a 5V signal on the ECHO pin. The script RPi_1_integration measures the pulse duration and calculates distance in centimeters. Importantly, the RPi GPIO needs to be at 3.3V, but the ECHO output from the sensor is 5V. Therefore, we must use a voltage divider (figure 2) and scale the voltage down to 3.3V. For our project, we used 1K for R1 and 2K for R2.
Figure 2. Voltage divider for ECHO pin on the ultrasonic sensor
We decided that a reasonable range for hand gesture recognition is between 0 and 20 centimeters. When the distance is less than 4 (when the top of the speaker is tapped), play or pause is triggered. When the distance is between 4 and 20, this number is scaled accordingly between 0 to 7 and sent over to RPi#2 via the GPIO pins. This number will be used to adjust the speaker volume.
RPi #1 also controls the LED strip. The LED strips perform a number of visual changes depending on the detected gestures. When the music is playing, the LED strips display a series of randomized color changes. When the music is paused, the LED strips display a static red color. When the music is resumed from a paused state, the LED strips display a static green color for a second before returning to the series of random colors. The brightness of the LED strip also correlates linearly to the volume of the audio (increasing volume increases brightness, and vice versa).
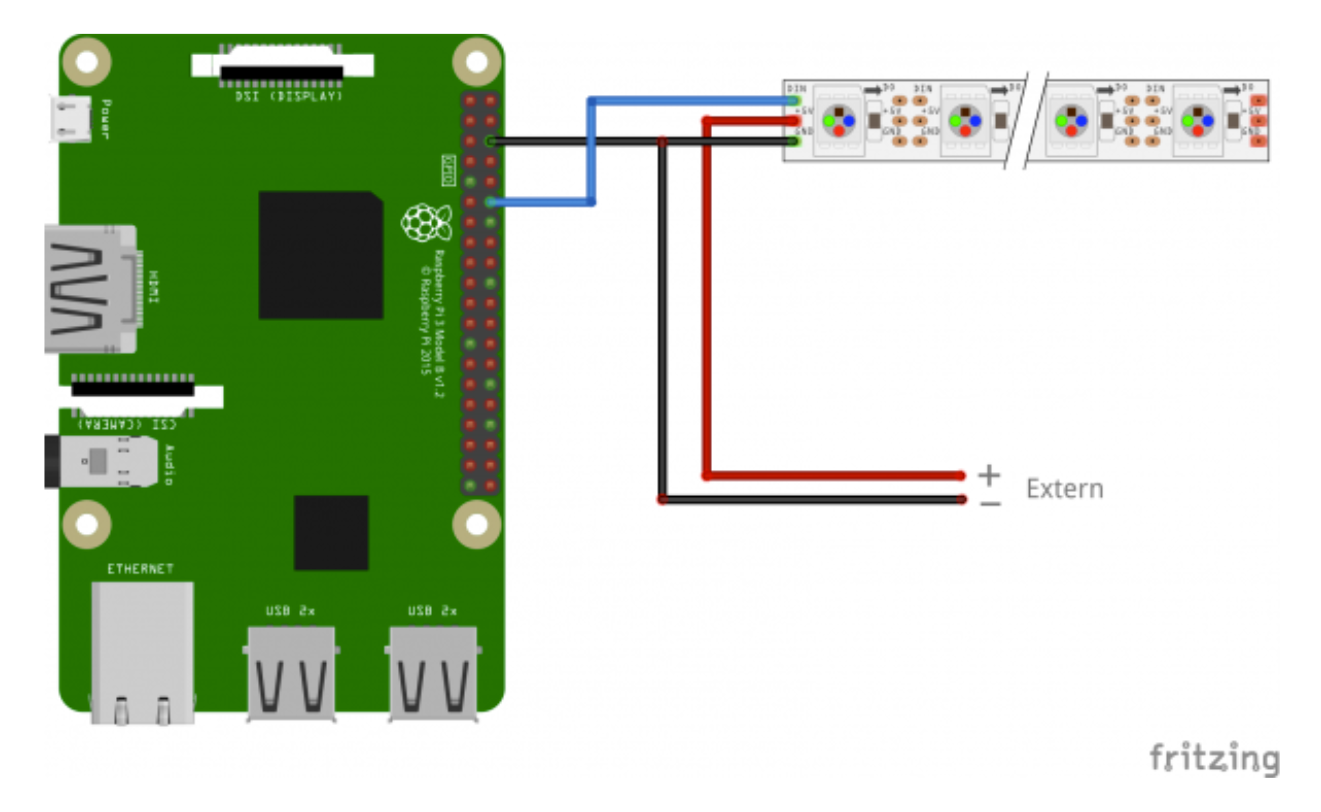
The model of the LED strip is the WS2812B strip, which is fully programmable and can be controlled using a Python Raspberry Pi library made for this family of products. The integration of the LEDs into the circuit is as follows; because we did not want to power the LEDs directly off the Raspberry Pi, an external power supply which provided 5V, 10A was used to power the strip. The external power supply’s positive end was connected to the LED strip directly, while the ground end was connected along with the ground of every other component. The LED strip’s ground end was also connected to this same point. Pin 18 of the Raspberry Pi was connected to the LED for control signals.
Figure 3. LED wiring (from tutorials-raspberrypi.com)
RPi_1_integration.py also contains the code being used to control the LED strips; the neopixel and board libraries in were imported, and the LED strip was initialized in the same file with the appropriate pixel pin number (18) and number of pixels. Several helper functions were implemented to control the LED strip. The function change_brightness takes in a value between 0.0 and 1.0 and changes the LED’s brightness accordingly, while the helpers show_red, show_green and random_color uses the pixels.fill method to change all LED colors instantly. The pixels.show() method is called every time there is a change made to the LEDs. All these functions can be seen in Code Appendix B.
The functionality RPi #1 controls were tested individually first using separate test scripts, which printed out the detected gestures and outputted LED visuals. One test script printed results the hand-gesture sensors returned in a loop, while another was used to visually check that the LED strips were working as intended. Once all of these functionalities were verified to be working correctly, the circuitry and LEDs were transferred to a protoboard to make the system more durable and secure.
RPi #2 uses much less circuitry than RPi #1 does, but is just as crucial for the speaker. One may wonder why two Raspberry Pis were used instead of just one. Because both the sound output and the LED control uses PWM, we had to use two separate Raspberry Pis to control each of these two functionalities. Outputting audio when the LEDs are being controlled stops the LED control, and controlling the LEDs when audio is being outputted stops the audio output.
RPi #2 receives streamed audio from devices via bluetooth using the A2DP (Advanced Audio Distribution Profile) protocol, which is considered the most widely used bluetooth audio streaming protocol. The A2DP’s wide range of use allows our speaker to connect to most, if not all commonly used bluetooth devices; tested devices include iPhones, PCs, and Macbook Pros.
Implementing the A2DP protocol for audio streaming was not too difficult, as it is documented very well all over the internet. The most helpful documentation for us was from raspberrypi.org (https://www.raspberrypi.org/forums/viewtopic.php?t=235519), which walks through the steps of enabling the audio profile sink role, as well as using the bluetoothctl command to initiate a bluetooth pairing between the Raspberry Pi and the bluetooth device. Unlike the guide, however, we used bluealsa to simplify this process; this guide is also a great starting point for using bluealsa to stream audio via A2DP (https://scribles.net/streaming-bluetooth-audio-from-phone-to-raspberry-pi-using-alsa/).
The specifics of the above steps are as follows. The configuration file for the bluealsa service was edited to enable the audio-profile-sink role (/lib/systemd/system/bluealsa.service). Next, the initial pairing of the bluetooth device with the Raspberry Pi was done using the bluetoothctl CLI: the Raspberry Pi was made discoverable (discoverable on) and an agent was set up (default-agent). After services were authorized, the command “trust” was used to let the Pi automatically accept connections from this point and onwards.
The testing of this functionality was pretty straightforward, as all we had to do was complete the setup steps above, run the command “bluealsa-aplay 00:00:00:00:00:00” to forward audio from the device to the Raspberry’s output, and check that the Pi was outputting the correct audio.
While the A2DP protocol is a one-way protocol over bluetooth (from device to Raspberry Pi), we also needed RPi #2 to send back commands to the bluetooth device for media control. For this functionality, the Audio/Video Remote Control Profile (AVRCP) protocol was used. Like the A2DP protocol, the AVRCP protocol is the most widely used protocol to control media playback over bluetooth. The wide use of AVRCP allows our speaker to not only control basic audio playback applications (Spotify, iTunes), but even playback on websites like Zoom. The code in code appendix A - control_playback.py - is what performs the AVRCP protocol functions.
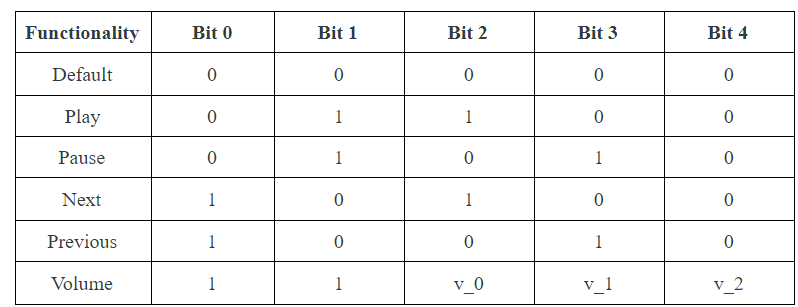
On a related note, having two Raspberry Pis meant that the two Pis needed to communicate in a fast, reliable way. While there are many known methods of making Raspberry Pis communicate, we decided to use five GPIO pins to let RPi #1 send over detected gestures to RPi #2. We decided on GPIO pins because of the simple nature of our messages - we only needed a one-way communication protocol (RPi #1 sends to RPi #2), and only had 6 different commands, as well as 8 possible volume integers to send, for which 5 bits were more than enough. Figure 3 depicts this 5-bit communication protocol in a table, where v_0, v_1 and v_2 indicate a binary number between 0 to 7, used for the volume level.
Figure 4. Communication between 2 Raspberry Pi's
Going back to the file control_playback.py, the GPIO_to_Command function reads the GPIO inputs and returns a Command (which is an Enum we defined) and a volume integer. As mentioned in the comments of the code, the volume integer is always zero for commands that are not volume-related, and ranges from 0 to 7, otherwise. The function GPIO_to_volume is a similar helper function that uses the three volume bits (v_0, v_1, v_2) to retrieve an integer to send back via AVRCP. While this volume can range from 0 to 127, because any volume below 64 was not really audible for our system, we scaled this number to between 64 and 127.
The main program of control_playback.py utilizes all the above helper functions in a GLib Main loop, as started by the line dbus.mainloop.glib.DBusGMainLoop. Once the signal receiver is added to the bus and initialization for AVRCP is complete, a while loop constantly polls for GPIO inputs using GPIO_to_Command and performs control(cmd, vol) - a function that takes in a Command and volume integer to set values for the media player interface - when a new command is detected.
The testing of the AVRCP protocol usage was also very simple. A test program that paused, played, and performed the other control commands depending on button presses on the piTFT was used to make sure that this functionality was working as intended. Once the LED control, gesture recognition, bluetooth audio streaming and bluetooth audio control were all verified and working, we put all parts together to build the speaker. Because each individual parts were tested prior to the building, the integration went very smoothly and no problems were encountered.
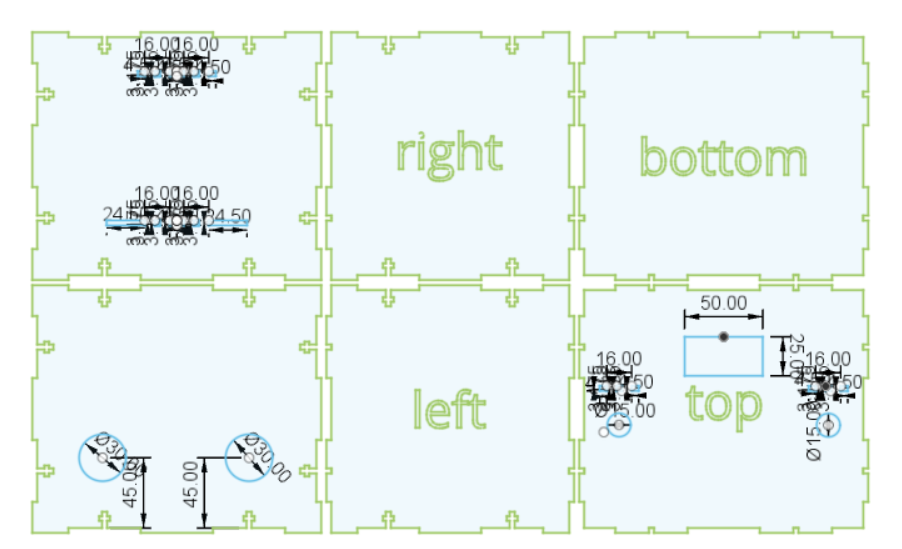
For the mechanical housing of the speaker, we first designed it in Fusion 360 and laser-cut it using plywood and acrylic sheets. We used T-slots for box connections where we can stabilize the 90-deg angles using nuts and bolts. We also designed a hole on the top for the ultrasonic sensor, and added two supporting shelves for the beam break sensors. To support the breadboard and the protoboard, we added shelves inside the box as well.
Figure 5. Speaker Box in Fusion 360
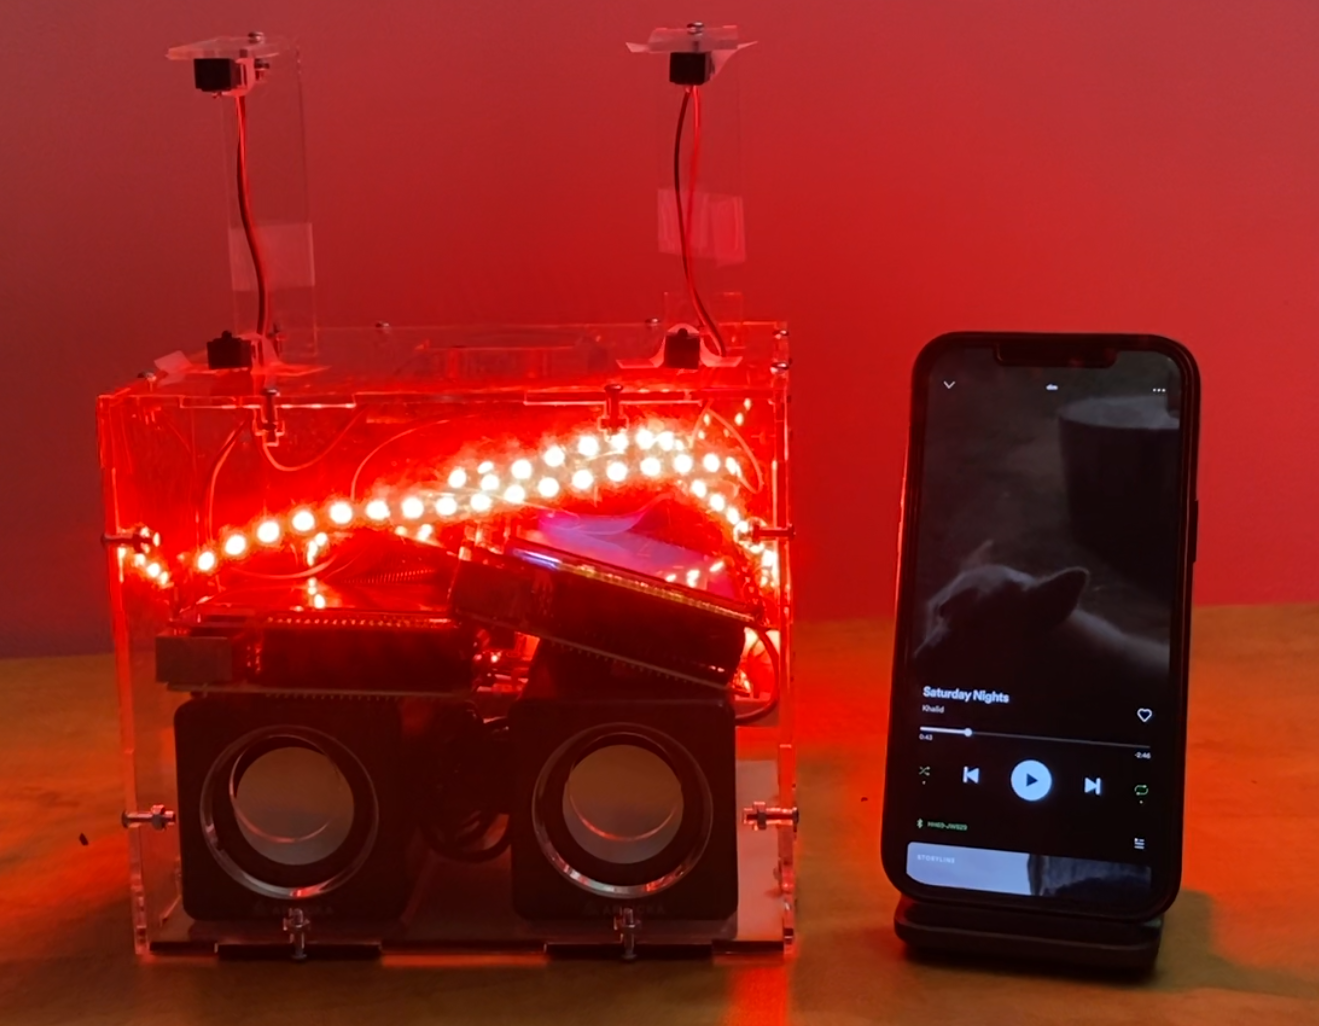
Figure 6. Speaker
Results and Conclusions
We were able to meet all but one goal outlined in the description; while the speaker performs every functionality we planned to implement perfectly, we did not take into account the fact that human hands have gaps between the fingers. Thus, while the gestures are acknowledged perfectly when using a piece of paper or cardboard, using a human hand turned out to be slightly less reliable. While this was quite an unfortunate limitation - especially considering that this was meant to be a “hand-gesture controlled speaker” - we think that this is not a very hard problem to fix (see Future Work section).
The performance related to bluetooth-streaming was pleasantly surprising. We noticed barely any delay between the hand gesture and the playback control, which requires signals from RPi #1 to be sent through 5 GPIO pins to RPi #2, which then sends controls via bluetooth to our device. The audio did not cut out and could be played from significant distances, despite the fact that RPi #2 was enclosed in the speaker case.
The internals of the speaker would have been cleaned up significantly if all functionality could be controlled using a single Raspberry Pi. As mentioned above, this was impossible because the use of PWM for the LED control and the audio output via 3.5mm would not function properly simultaneously. Theoretically, using a HDMI-to-3.5mm converter could resolve this problem, as then the 3.5mm is no longer being used and a digital signal is used instead to output audio via HDMI, but we never got to test this; there was no need to purchase additional converters when we already had two Raspberry Pis in our hands.
Future Work
To improve our project, we would firstly like to add an amplifier circuit for our bluetooth speaker. Currently, the speaker isn’t very loud, and the sound quality would be much better with an audio amplifier. Additionally, as mentioned above, the speaker sometimes does not recognize gestures made by hands perfectly, and thus we are currently using a piece of paper to control the speaker reliably. We believe this is because our hands are not continuous, flat objects, and that the gaps between our fingers make it hard for the sensors to detect gestures. To fix this issue, we can possibly mount the beam-break sensors differently so that the sensors can detect the palm instead of fingers. To improve the visual effects, we can modify the LED strip control to change its color based on the beat of the music while music is playing, as the LED strips only change brightness and displays random colors when a song is played. Lastly, as mentioned in the previous section, we could attempt to reduce the need for a second Raspberry Pi and a complicated circuit by using a HDMI-to-3.5mm converter.
Hyun Jong Lee: Software-related design and testing, bluetooth audio streaming (A2DP), bluetooth audio media control (AVRCP), results and conclusions, future work
Emily Wang: Objectives, introduction, hardware-related design and testing, sensor integration and setup, construction of enclosure, future work
# file for RPi #1 that detects gestures as well as controling LEDs
# Once a gesture is detected, LEDs are manipulated first
# Afterwards, GPIO pins are changed accordingly for RPi #2 to detect
import RPi.GPIO as GPIO
import time
import board
import neopixel
import random
# Sensor initializations
beam_pin_R = 6
beam_pin_L = 5
TRIGGER = 26
ECHO = 19
LED = 13
GPIO.setmode(GPIO.BCM)
GPIO.setup(TRIGGER,GPIO.OUT)
GPIO.setup(ECHO,GPIO.IN)
GPIO.setup(beam_pin_L, GPIO.IN,pull_up_down = GPIO.PUD_UP)
GPIO.setup(beam_pin_R, GPIO.IN,pull_up_down = GPIO.PUD_UP)
# Communication protocol initializations
S0 = 23
S1 = 12
S2 = 16
S3 = 20
S4 = 21
GPIO.setup(S0, GPIO.OUT)
GPIO.setup(S1, GPIO.OUT)
GPIO.setup(S2, GPIO.OUT)
GPIO.setup(S3, GPIO.OUT)
GPIO.setup(S4, GPIO.OUT)
# default to all 0's
GPIO.output(S0, GPIO.LOW)
GPIO.output(S1, GPIO.LOW)
GPIO.output(S2, GPIO.LOW)
GPIO.output(S3, GPIO.LOW)
GPIO.output(S4, GPIO.LOW)
# LED initialization
current_color = 0 # off is 0, red is 1, green is 2, random is 3
pixel_pin = board.D18
num_pixels = 100
ORDER = neopixel.GRB
pixels = neopixel.NeoPixel(pixel_pin, num_pixels, brightness=0.2, auto_write=False, pixel_order=ORDER)
change_brightness(pixels,0.7)
# state initializations
status = 0
playing = 1
print('setup finished')
# helpers for LEDs
def show_red(pixels):
pixels.fill((255, 0, 0))
pixels.show()
def show_green(pixels):
pixels.fill((0, 255, 0))
pixels.show()
def show_blue(pixels):
pixels.fill((0, 0, 255))
pixels.show()
def random_color(pixels):
pixels.fill((random.randint(0,255), random.randint(0,255), random.randint(0,255)))
pixels.show()
def change_brightness(pixels, level):
pixels.brightness = level
pixels.show()
def control_led(pixels):
global playing
global current_color
if playing == 1:
if current_color != 3:
current_color = 3
random_color(pixels)
# helpers for sensors
def get_beam_L():
if not GPIO.input(beam_pin_L):
return 1
else:
return 0
def get_beam_R():
if not GPIO.input(beam_pin_R):
return 1
else:
return 0
def swiped():
global status
if get_beam_L()==1:
for counter in range(0,1000000):
if get_beam_R()==1:
print("******Next Song*****")
status = 1
break
elif get_beam_R()==1:
for counter in range(0, 1000000):
if get_beam_L()==1:
print("*****Previous Song******")
status = 2
break
else:
status = 0
return
def distance():
GPIO.output(TRIGGER,GPIO.HIGH)
time.sleep(0.00001)
GPIO.output(TRIGGER,GPIO.LOW)
StartTime = time.time()
StopTime = time.time()
while GPIO.input(ECHO) == 0:
StartTime = time.time()
while GPIO.input(ECHO) == 1:
StopTime = time.time()
TimeElapsed = StopTime-StartTime
distance=TimeElapsed*17150
return distance
def distance2GPIO(dist):
temp = bin(int(dist))
if dist == 0:
GPIO.output(S4, GPIO.LOW)
GPIO.output(S3, GPIO.LOW)
GPIO.output(S2, GPIO.LOW)
elif dist == 1:
GPIO.output(S4, GPIO.HIGH)
GPIO.output(S3, GPIO.LOW)
GPIO.output(S2, GPIO.LOW)
elif dist == 2:
GPIO.output(S4, GPIO.LOW)
GPIO.output(S3, GPIO.HIGH)
GPIO.output(S2, GPIO.LOW)
elif dist == 3:
GPIO.output(S4, GPIO.HIGH)
GPIO.output(S3, GPIO.HIGH)
GPIO.output(S2, GPIO.LOW)
elif dist == 4:
GPIO.output(S4, GPIO.LOW)
GPIO.output(S3, GPIO.LOW)
GPIO.output(S2, GPIO.HIGH)
elif dist == 5:
GPIO.output(S4, GPIO.HIGH)
GPIO.output(S3, GPIO.LOW)
GPIO.output(S2, GPIO.HIGH)
elif dist == 6:
GPIO.output(S4, GPIO.LOW)
GPIO.output(S3, GPIO.HIGH)
GPIO.output(S2, GPIO.HIGH)
elif dist == 7:
GPIO.output(S4, GPIO.HIGH)
GPIO.output(S3, GPIO.HIGH)
GPIO.output(S2, GPIO.HIGH)
try:
while True:
control_led(pixels)
swiped()
dist = int(distance())
# next song
if (status == 1):
GPIO.output(S0, GPIO.HIGH)
GPIO.output(S2, GPIO.HIGH)
GPIO.output(S1, GPIO.LOW)
GPIO.output(S3, GPIO.LOW)
GPIO.output(S4, GPIO.LOW)
time.sleep(1)
GPIO.output(S2, GPIO.LOW)
GPIO.output(S0, GPIO.LOW)
# previous song
elif (status == 2):
GPIO.output(S0, GPIO.HIGH)
GPIO.output(S3, GPIO.HIGH)
GPIO.output(S2, GPIO.LOW)
GPIO.output(S1, GPIO.LOW)
GPIO.output(S4, GPIO.LOW)
time.sleep(1)
GPIO.output(S3, GPIO.LOW)
GPIO.output(S0, GPIO.LOW)
# detect hand motion
elif (dist < 20):
# pause
if (dist<4 and playing == 1):
print('PAUSE')
playing = 0
GPIO.output(S1, GPIO.HIGH)
GPIO.output(S3, GPIO.HIGH)
GPIO.output(S2, GPIO.LOW)
GPIO.output(S4, GPIO.LOW)
GPIO.output(S0, GPIO.LOW)
change_brightness(pixels, 1.0)
show_red(pixels)
time.sleep(1.5)
GPIO.output(S3, GPIO.LOW)
GPIO.output(S1, GPIO.LOW)
# play
elif (dist<4 and playing == 0):
print('PLAY')
playing = 1
GPIO.output(S1, GPIO.HIGH)
GPIO.output(S2, GPIO.HIGH)
GPIO.output(S0, GPIO.LOW)
GPIO.output(S3, GPIO.LOW)
GPIO.output(S4, GPIO.LOW)
change_brightness(pixels, 1.0)
show_green(pixels)
time.sleep(1.5)
GPIO.output(S2, GPIO.LOW)
GPIO.output(S1, GPIO.LOW)
# detecting volume
elif (dist >= 4 and playing == 1):
print('DETECTING VOLUME')
# send signal for detecting volume
GPIO.output(S0, GPIO.HIGH)
GPIO.output(S1, GPIO.HIGH)
dist_scaled = int(((dist-4)/(20-4))*7)
while (20 >= dist >= 4):
vol_scaled = ((dist - 4.0)/(20-4)) + 0.1
if vol_scaled > 1.0:
vol_scaled = 1.0
if vol_scaled < 0.0:
vol_scaled = 0.0
change_brightness(pixels, vol_scaled)
distance2GPIO(dist_scaled)
dist = int(distance())
dist_scaled = int(((dist-4)/(20-4))*7)
time.sleep(1)
GPIO.output(S2, GPIO.LOW)
GPIO.output(S3, GPIO.LOW)
GPIO.output(S4, GPIO.LOW)
GPIO.output(S0, GPIO.LOW)
GPIO.output(S1, GPIO.LOW)
else:
print("HERE AT DEFAULT")
GPIO.output(S0, GPIO.LOW)
GPIO.output(S1, GPIO.LOW)
GPIO.output(S2, GPIO.LOW)
GPIO.output(S3, GPIO.LOW)
GPIO.output(S4, GPIO.LOW)
time.sleep(0.2)
except KeyboardInterrupt:
pass
GPIO.cleanup()
exit()
control_playback.py
                # Hyun Jong Lee (hl693), Emily Wang (jw829)
                # This file is to be used on RPi #2
                # Takes in inputs from RPi #1 via GPIO inputs 5, 6, 13, 19 and 26
                # 5-bit inputs are translated to Commands, which are sent back to
                # the bluetooth device via AVRCP protocol
                # Code referenced from https://scribles.net/controlling-bluetooth-audio-on-raspberry-pi/#Ref01

                # IMPORTANT: "bluealsa-aplay 00:00:00:00:00:00 &" must be running, and bluetooth device must be connected to RPi
                import dbus, dbus.mainloop.glib
                from gi.repository import GLib
                import RPi.GPIO as GPIO
                from enum import Enum
                import time

                # Enums for commands
                class Command(Enum):
                    DEFAULT = '0b00000'
                    PLAY = '0b01100'
                    PAUSE = '0b01010'
                    NEXT = '0b10100'
                    PREVIOUS = '0b10010'
                    VOL = '0b11xxx'

                # GPIO Initialization
                GPIO.setmode(GPIO.BCM)
                GPIO.setup(5, GPIO.IN)
                GPIO.setup(6, GPIO.IN)
                GPIO.setup(13, GPIO.IN)
                GPIO.setup(19, GPIO.IN)
                GPIO.setup(26, GPIO.IN)

                # Function that reads the GPIO inputs and returns a Command Enum and a volume integer
                # Volume integer will be always zero for commands that aren't VOL
                def GPIO_to_Command():
                    res = '0b'
                    if (GPIO.input(5)):
                        res += '1'
                    else:
                        res += '0'
                    if (GPIO.input(6)):
                        res += '1'
                    else:
                        res += '0'
                    if (GPIO.input(13)):
                        res += '1'
                    else:
                        res += '0'
                    if (GPIO.input(19)):
                        res += '1'
                    else:
                        res += '0'
                    if (GPIO.input(26)):
                        res += '1'
                    else:
                        res += '0'
                    if res[2] == '1' and res[3] == '1':
                        return Command.VOL, GPIO_to_volume(res)
                    else:
                        return Command(res), 0

                # Returns a scaled volume to send back to bluetooth device
                # While actual volume range is between 0 to 127, anything below
                # volume of 64 is not audible, so scale to 64 to 127
                def GPIO_to_volume(binary):
                    res = '0b'
                    if binary[4] == '1':
                        res += '1'
                    else:
                        res += '0'
                    if binary[5] == '1':
                        res += '1'
                    else:
                        res += '0'
                    if binary[6] == '1':
                        res += '1'
                    else:
                        res += '0'
                    res = (16*(int(res, 2) + 1) - 1)/2 + 63
                    return res

                # Function that takes in a command and a volume to
                # control the media playback
                def control(cmd, vol):
                    if cmd == Command.PLAY:
                        player_iface.Play()
                    elif cmd == Command.PAUSE:
                        player_iface.Pause()
                    elif cmd == Command.NEXT:
                        player_iface.Next()
                    elif cmd == Command.PREVIOUS:
                        player_iface.Previous()
                    elif cmd == Command.VOL:
                        transport_prop_iface.Set('org.bluez.MediaTransport1', 'Volume', dbus.UInt16(vol))
                    elif cmd == Command.DEFAULT:
                        pass
                    if cmd != Command.DEFAULT:
                        print("command: ", cmd)
                        if cmd == Command.VOL:
                            print("volume: ", vol)
                    return

                def on_property_changed(interface, changed, invalidated):
                    if interface != 'org.bluez.MediaPlayer1':
                        return

                # main program
                if __name__ == '__main__':
                    dbus.mainloop.glib.DBusGMainLoop(set_as_default=True)
                    bus = dbus.SystemBus()
                    obj = bus.get_object('org.bluez', "/")
                    mgr = dbus.Interface(obj, 'org.freedesktop.DBus.ObjectManager')
                    player_iface = None
                    transport_prop_iface = None
                    for path, ifaces in mgr.GetManagedObjects().items():
                        if 'org.bluez.MediaPlayer1' in ifaces:
                            player_iface = dbus.Interface(
                                    bus.get_object('org.bluez', path),
                                    'org.bluez.MediaPlayer1')
                        elif 'org.bluez.MediaTransport1' in ifaces:
                            transport_prop_iface = dbus.Interface(
                                    bus.get_object('org.bluez', path),
                                    'org.freedesktop.DBus.Properties')
                    bus.add_signal_receiver(on_property_changed, bus_name='org.bluez', signal_name='PropertiesChanged', dbus_interface='org.freedesktop.DBus.Properties')
                    last_cmd = Command.DEFAULT
                    try:
                        while(1):
                            time.sleep(0.5)
                            cmd, vol = GPIO_to_Command()
                            if cmd == Command.VOL:
                                control(cmd,vol)
                            else:
                                if cmd != last_cmd:
                                    control(cmd, vol)
                            last_cmd = cmd
                    except KeyboardInterrupt:
                        GPIO.cleanup()
                    quit()